Structure Designer: Difference between revisions
Created page with "==Overview== <br> Structure Designer is a structure generation and lead optimization tool that works with ACD/Percepta Profilers and ACD/Percepta Predictors to permit the expl..." |
No edit summary |
||
| Line 34: | Line 34: | ||
<li>Adjust the sliders to specify the desired physicochemical property ranges of generated analogs. Aim at green areas to fulfill the defined project objectives. The vertical lines indicate the values of the current molecule.</li><br> | <li>Adjust the sliders to specify the desired physicochemical property ranges of generated analogs. Aim at green areas to fulfill the defined project objectives. The vertical lines indicate the values of the current molecule.</li><br> | ||
</ol></li> | </ol></li> | ||
<li>Structure pane contains an in-place structure editor that allows modifying the current molecule without resorting to an external program.[[File:sd_structure_editor.png|right]]<br><br> | <li>Structure pane contains an in-place structure editor that allows modifying the current molecule without resorting to an external program.[[File:sd_structure_editor.png|right]]<br><br> | ||
<ol style="list-style-type:lower-latin"> | <ol style="list-style-type:lower-latin"> | ||
Revision as of 07:48, 11 September 2012
Overview
Structure Designer is a structure generation and lead optimization tool that works with ACD/Percepta Profilers and ACD/Percepta Predictors to permit the exploration of new ideas while providing immediate feedback on the likely impact of structural changes on property outcomes. Users can now rapidly generate large libraries of analogs around lead compounds with an optimal balance of relevant physchem, ADME, and Tox properties.
Features
- Generate analogs with Structure Designer’s suggested substituent modifications based on user-defined physicochemical, ADME, and toxicity criteria
- Modify sets of structures with the interactive optimization tool
- Sort through hundreds of analogs by prioritizing structures according to specific property criteria with Percepta Profilers
- Gain insight into structure-property relationships with Percepta Predictors
- Create custom fragment libraries based on your in-house compound collection
- Build synthetically accessible fragments using a set of retrosynthetic rules
- Discover the most favorable regions in the physicochemical property space to achieve an optimal balance of relevant ADME characteristics
- Identify structural fragments responsible for hazardous activity
Interface
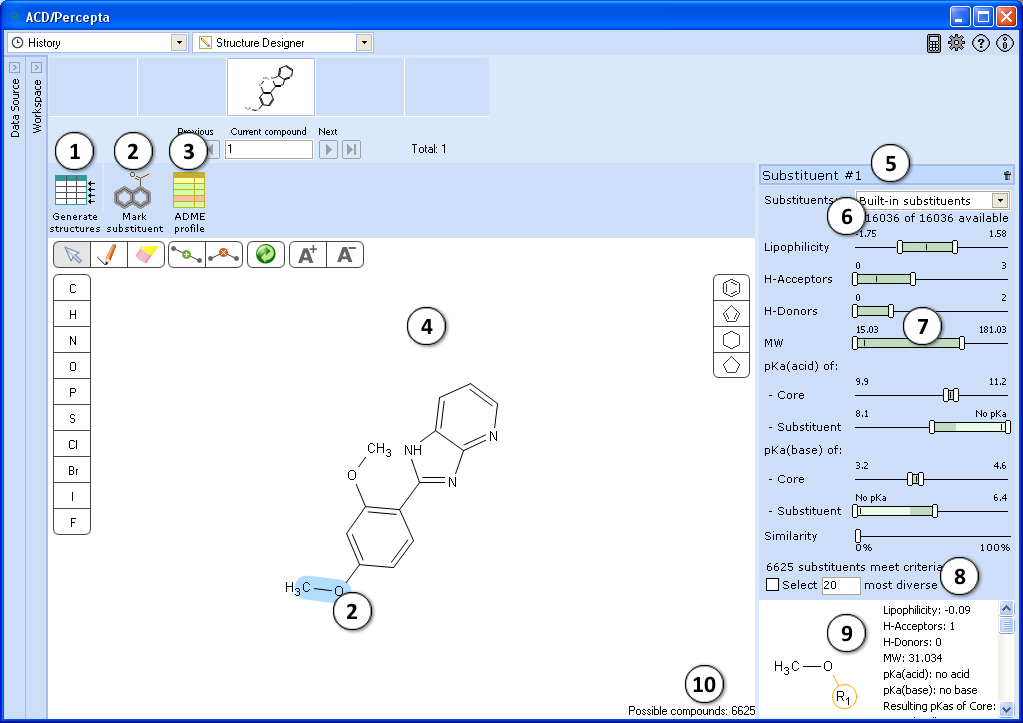
Prior to using Structure Designer, select a data source to browse for the structures you will be modifying, and to store generated analogs. When starting with a single structure, simply load it into any prediction module, or alternatively, draw it within the Structure Designer using the built-in tools (see below).

- Generate structures – once the substituents to be modified are selected and substituent selection criteria are set, press this button to generate the respective analogs and transfer them to a currently selected spreadsheet project.
Note: If a read-only project (e.g., History) is selected in the Data Source pane, the software will suggest creating a new one automatically. - Mark substituent – marks selected structure fragment as a substituent. The selected fragment is highlighted in blue. The substituent must have only one attachment point to the remaining part of the molecule. Trying to select a substituent with multiple attachment points would result in an error message “Selection not valid. Too many radicals”.
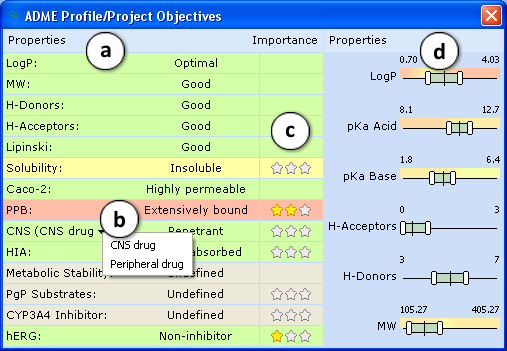
- ADME profile – opens the ADME Profile/Project Objectives window to predict ADME profile of the current molecule and specify the desired property ranges of the analogs to be generated:

- A predefined list of predicted physicochemical, ADME and drug safety-related properties of the compound. Predictions are categorized and color-mapped according to their impact on the compound’s viability to be used as a drug (green – favorable, yellow – average, red – unfavorable, gray – undefined).
- Select a drop-down menu entry to reverse the project target regarding disposition into CNS. “CNS drug” option will set BBB penetration as favorable, while “Peripheral drug” option will display the green flag for molecules restricted from CNS.
- Select an appropriate amount of stars to indicate the relative importance of the corresponding property in your project. To cancel the ranking – reduce the importance to the one star and click it once again to reset.
Once the importance is defined for any property, the property scales on the right are colored according to contributions of physicochemical parameters to that property at different value ranges. If several properties are selected, the colors will display the cumulative physicochemical effect on these properties weighted by their importance. In this way, the color-mapping allows identifying regions in physicochemical space, favorable for the objectives of your project. - Adjust the sliders to specify the desired physicochemical property ranges of generated analogs. Aim at green areas to fulfill the defined project objectives. The vertical lines indicate the values of the current molecule.
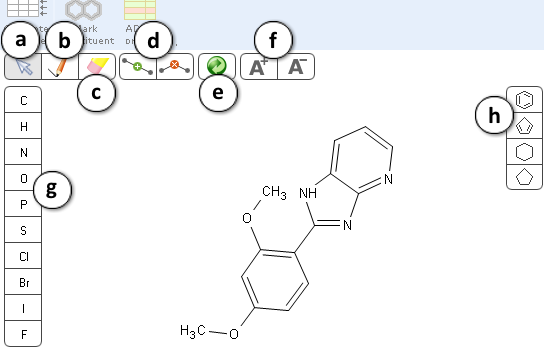
- Structure pane contains an in-place structure editor that allows modifying the current molecule without resorting to an external program.

- Selection tool – lasso any fragment of a structure to select it.
- Drawing tool – click or drag the mouse to draw a new molecule or add new fragments to an existing one.
- Eraser tool – click on the atoms or bonds to delete any part of the structure.
- Insert and Remove tools are useful when you need to increase or decrease the length of the atom chain, e.g. when studying homologs.
Select the Insert tool and click on a bond to add a new atom in the middle of the respective chain or ring.
Select the Remove tool and click on an atom to delete it and automatically connect the neighboring atoms. - Clean structure tool – perform automatic layout of the structure sketch to provide a more visually pleasing and aesthetic look.
- Set charge tools. Select A+ or A- tool and click on an atom to increase or decrease its charge.
- Element toolbar. Select an element and click on an atom to change the element type. Alternatively you may hover over the atom, and type the desired element symbol.
- Ring toolbar – select from a set of most common ring types.
- After selecting a substituent and clicking the Mark substituent button the Substituent pane will appear. If two or more substituents are marked, the corresponding panes will be consecutively numbered. The panes can be viewed simultaneously by dragging them halfway up or down.
- Select the database of substituents to use for analog generation.
- Adjust the sliders to specify the desired ranges of substituent properties. The Substituent panes are interconnected with ADME Profile/Project Objectives window, so that any changes of substituent property ranges will be automatically reflected in the respective ranges for the entire molecule (see 4d), and vice versa.
- Displays the number of substituents that meet the specified criteria. To select the designated number of most diverse compounds check the box and type the desired number.
- Displays a list of substituents satisfying the currently specified filter criteria.
- The overall number of possible analogs with respect to suitable replacement fragments for all marked substituents is displayed in the bottom right corner of the main window.