Using ACD/Percepta: Difference between revisions
Jump to navigation
Jump to search
No edit summary |
Updated for 2021.1 release |
||
| (7 intermediate revisions by 2 users not shown) | |||
| Line 11: | Line 11: | ||
<li>Type any text string in the text field to perform a quick search of a particular item.</li><br> | <li>Type any text string in the text field to perform a quick search of a particular item.</li><br> | ||
<li>Switch between data sources or modules by clicking the appropriate Tree View item. Click "+" and "-" nodes to expand/collapse the corresponding module group.</li><br> | <li>Switch between data sources or modules by clicking the appropriate Tree View item. Click "+" and "-" nodes to expand/collapse the corresponding module group.</li><br> | ||
<li><span id="Expert Panel">''' | <li><span id="Expert Panel">'''Expert Panel'''</span> - Opens the '''Expert Panel''' window. In several modules, a variety of different calculation algorithms and other configuration options are available. An expert administrator could use the '''Expert Panel''' to configure the default settings for these modules. If '''ACD/Percepta''' is installed with restricted privileges, the [[Image:spannericon.png]] icon is not available, so that the users will not need to deal with the settings themselves, and the calculations will always be performed using the pre-configured defaults.<br> | ||
<ol style="list-style-type:lower-latin"> | |||
<li>Set the algorithms which will be used for logP, pKa and LogS calculation by default.</li> | {| | ||
|- style="vertical-align:top;" | |||
|[[File:expert_panel.png]] | |||
| style="vertical-align:top; text-align:left;" |<ol style="list-style-type:lower-latin"> | |||
<li>Set the algorithms which will be used for logP, pKa and LogS calculation by default.</li><br> | |||
<li>Click '''Configure''' to set the training options for a particular model.<br>[[File:expert_panel_configure.png]]<br><br></li> | <li>Click '''Configure''' to set the training options for a particular model.<br>[[File:expert_panel_configure.png]]<br><br></li> | ||
<li>Check the box to set automatic tautomer selection mode for all compounds submitted for calculation.</li> | <li>Check the box to set automatic tautomer selection mode for all compounds submitted for calculation.</li><br> | ||
</ol><br> | <li>Click '''Configure''' to set the default spreadsheet template for use in subsequently created projects. All saved templates should be automatically displayed in the listbox, unless saved to a non-standard location. In that case you may need to click '''...''' button and manually navigate to the folder containing the template file (.chstpl extension).<br>[[File:configure_spreadsheet_templates.png]]</li><br> | ||
<li>Check the box to make the default template mandatory for all new projects created by Non-Expert users. In this case, their newly created projects will automatically contain all columns stored in the template. This option has no effect on Expert users.</li><br> | |||
<!--<li>Set the default molecule editor that will be launched after clicking [[File:Edit_pictogram.png]] in Module view or '''Edit Structure''' dialog boxes. Currently, an internal editor that is displayed within '''ACD/Percepta''' window, and external Accelrys Draw editors are supported.</li><br>--> | |||
<li>Set the number of molecules (each occupying a single column) to be displayed per page in the PDF reports generated from Spreadsheet view</li> | |||
<li>Check this option to include two additional fields in the output produced by GALAS models in Spreadsheet. These auxiliary fields are the individual constituents of the overall Reliability Index (RI) value: Similarity Index (SI) and Data-Model Consistency Index (DMCI). Check the topic on [[Trainable Models]] and technical information about the relevant Prediction Modules for more details.</li> | |||
<li>Activate or deactivate the extended tooltips providing detailed [[Context Help]] on various components of the user interface.</li> | |||
</ol><br /> | |||
|} | |||
Various configuration options are also accessible directly from the respective modules, while in LogP and pKa module groups, dedicated modules are displayed for different calculation algorithms. When '''Simple View''' is enabled, single LogP and pKa modules are listed, while the '''Expert Panel''' and other configuration functionality is not available.</li><br> | Various configuration options are also accessible directly from the respective modules, while in LogP and pKa module groups, dedicated modules are displayed for different calculation algorithms. When '''Simple View''' is enabled, single LogP and pKa modules are listed, while the '''Expert Panel''' and other configuration functionality is not available.</li><br> | ||
<li>'''Help''' – Opens the '''ACD/Percepta''' Online Help in a separate web browser window.</li><br> | <li>'''Help''' – Opens the '''ACD/Percepta''' Online Help in a separate web browser window.</li><br> | ||
<li>'''Information''' – Opens the '''About Box''' that displays a list of all installed '''ACD/Percepta''' modules. Click OK to close this window.</li> | <li>'''Information''' – Opens the '''About Box''' that displays a list of all installed '''ACD/Percepta''' modules. Click OK to close this window.</li> | ||
</ol> | </ol> | ||
Latest revision as of 08:31, 28 July 2021
The first time you start ACD/Percepta, algorithms are loaded to your PC’s operating memory. Depending on the speed of your PC, this can take up to several minutes. All subsequent starts take only several seconds.
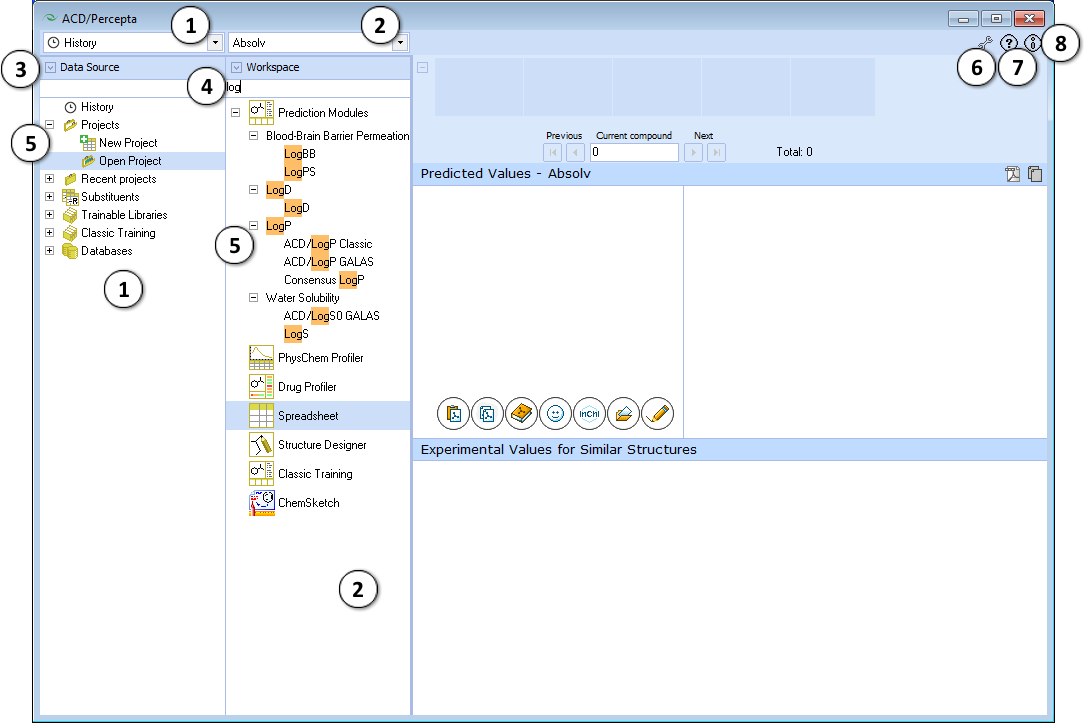
After the program starts choose the data source and the workspace of interest.

- The Data Source panel lists all data sets, projects, trainable libraries, and reference databases accessible with ACD/Percepta. They also can be accessed from the drop down menu in the upper part of the panel.
- The Workspace panel displays a list of all installed ACD/Percepta modules. They also can be accessed from the drop down menu in the upper part of the panel.
- Click the arrow button to expand/collapse the panels.
- Type any text string in the text field to perform a quick search of a particular item.
- Switch between data sources or modules by clicking the appropriate Tree View item. Click "+" and "-" nodes to expand/collapse the corresponding module group.
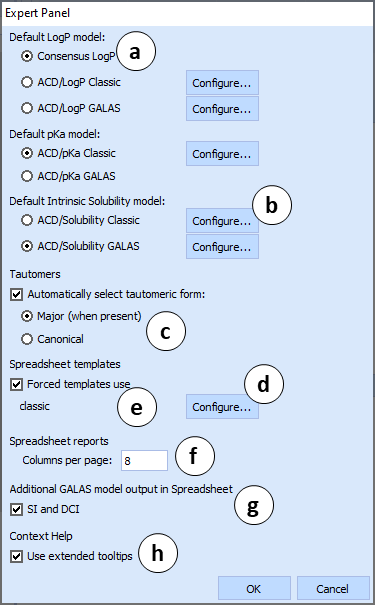
- Expert Panel - Opens the Expert Panel window. In several modules, a variety of different calculation algorithms and other configuration options are available. An expert administrator could use the Expert Panel to configure the default settings for these modules. If ACD/Percepta is installed with restricted privileges, the
 icon is not available, so that the users will not need to deal with the settings themselves, and the calculations will always be performed using the pre-configured defaults.
Various configuration options are also accessible directly from the respective modules, while in LogP and pKa module groups, dedicated modules are displayed for different calculation algorithms. When Simple View is enabled, single LogP and pKa modules are listed, while the Expert Panel and other configuration functionality is not available.
- Set the algorithms which will be used for logP, pKa and LogS calculation by default.
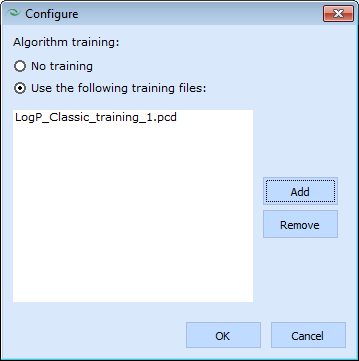
- Click Configure to set the training options for a particular model.

- Check the box to set automatic tautomer selection mode for all compounds submitted for calculation.
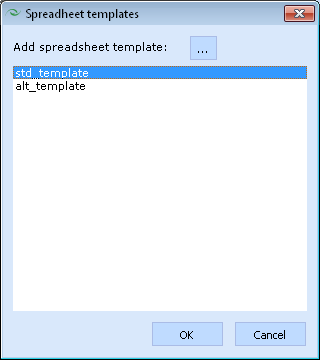
- Click Configure to set the default spreadsheet template for use in subsequently created projects. All saved templates should be automatically displayed in the listbox, unless saved to a non-standard location. In that case you may need to click ... button and manually navigate to the folder containing the template file (.chstpl extension).

- Check the box to make the default template mandatory for all new projects created by Non-Expert users. In this case, their newly created projects will automatically contain all columns stored in the template. This option has no effect on Expert users.
- Set the number of molecules (each occupying a single column) to be displayed per page in the PDF reports generated from Spreadsheet view
- Check this option to include two additional fields in the output produced by GALAS models in Spreadsheet. These auxiliary fields are the individual constituents of the overall Reliability Index (RI) value: Similarity Index (SI) and Data-Model Consistency Index (DMCI). Check the topic on Trainable Models and technical information about the relevant Prediction Modules for more details.
- Activate or deactivate the extended tooltips providing detailed Context Help on various components of the user interface.
- Help – Opens the ACD/Percepta Online Help in a separate web browser window.
- Information – Opens the About Box that displays a list of all installed ACD/Percepta modules. Click OK to close this window.